

AIReady User Guide
Overview
Getting Started
- Who is this guide for?
- Step 0 - Preparation
- Step 1 – Create a text variable to pass the prompt to ChatGPT
- Step 2 – Create a text variable to receive the ChatGPT response
- Step 3 – Create a button to call ChatGPT
- Step 4 – Copy the below JavaScript code into the Editor
- Step 5 – Update the prompt.
- Step 6 – Display the output in your slide.
- Step 7 – Publish to the web to test.
Other Use Cases
Advanced Techniques
Model Switcher
Enhanced Metadata Options for User Insights Report
Overview
Welcome to the world of AI-powered learning in eLearning modules! This user guide will show you how to incorporate AI into your e-learning content using Artha’s AIReady plugin.
Create intelligent characters, engage learners in dynamic conversations, and deliver personalized learning experiences. With an AIReady subscription, this guide can equip you with the knowledge and techniques needed to bring your learning to life in ways you’ve only imagined.
Who is this guide for
Built for eLearning Designers & Developers who have an active subscription to Artha’s AIReady plugin, we’ll walk you through the steps of integrating AI into your eLearning courses.
Note: While we’ve tailored the example code specifically for Storyline 360, the code and steps can be used in any other authoring tool that has JavaScript functionality.
AIReady Key
The code works only with Artha Learning’s API key that is unique to you. You are provided the API key in an email after subscription. You will need to replace the AIReady key in the code here to make it work.
AIReady Docs Add-on
AIReady Docs add-on enables you to have AI work specifically with your documents as its context. Once you have sent your text-only documents to aiready@arthalearning.com, we will generate unique document ID(s) for you. Use this document ID within newline characters “ \n” as part of any query to enable the document context.
AIReady Code
					var player = GetPlayer();

var userPrompt = player.GetVar('TextEntry');

//This is the AI Prompt. Change it as needed. Ensure to keep the whole prompt in a single line. no matter how long.
AIPrompt = "This is what user is asking: " + userPrompt + " Answer this question in 3 sentences:";

// Make the API call to Artha's GPT API. You won't need to make changes to the below code except to rename the GPT response variable if necessary.
AIReadyKey='REPLACE THIS WITH YOUR AIREADY KEY';

fetch(AIReadyKey, {
    method: 'POST',
    body: JSON.stringify(AIPrompt),
    headers: {
        "Content-Type": "application/json",
    },
})
 .then(response => {
    if (!response.ok) {
      // Create an error and include both the status code and the response text
      return response.text().then(body => {
        throw new Error(`HTTP status code: ${response.status}, Body: ${body}`);
      });
    }
    return response.json();
  })
  .then(data => {
        data = JSON.parse(data.body);
        player.SetVar('GPT_Response', data);
    })
    .catch(error => {
        console.error('Error fetching GPT response:', error.message);
        // Provide a standard error response
        const gptResponse = "We can't analyse your answer right now. Please try again later. In the meantime, you could review and reflect on your course content.";
        // Set a variable in Articulate Storyline to store the response
        player.SetVar('GPT_Response', gptResponse);
    });
AIReady Docs Add-on code
To use your specific document as a context source, replace the AIPrompt line to:
AIPrompt = " \n<document>Your document ID</document>\n " + " This is what user is asking: " + userPrompt + " Answer this question in 3 sentences:";
Note: that it is essential that the document ID is flanked by newline characters (\n) on both ends as shown above.
Getting Started
There are many applications of AI Integration. We will start with a simple, default example, and then show more complex use cases.
Big Idea: This API works quite similarly to the usual AI Chatbot. You ask it a question, and it provides an answer. To integrate it within an eLearning, we need to 1) Gather user input, 2) Create a prompt to send to AI, and 3) Receive AI’s answer back in a variable.
Use Case: Answering an open-text learner question using ChatGPT.
Who is this guide for?
Built for eLearning Designers & Developers who have an active subscription to Artha’s AIReady plugin, we’ll walk you through the steps of integrating AI into your eLearning courses.
Step 0 – Preparation
In a new slide, create a text data entry field for the learners to type their question.
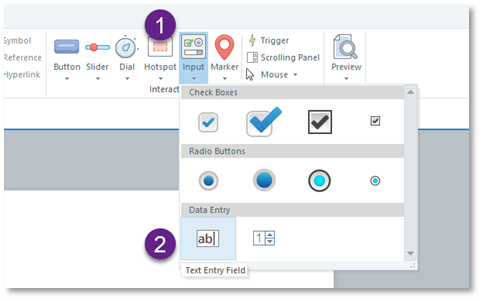
Step 1 – Create a text variable to pass the prompt to ChatGPT
This creates an automatic trigger and a variable called TextEntry.
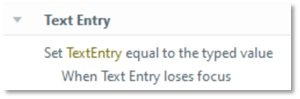
We will pass this variable to ChatGPT via a JavaScript trigger. If the name of the input variable is different from TextEntry (such as TextEntry1), you will need to update your AIReady Code as shown highlighted in the figure below.

Note: The TextEntry variable is then stored in JavaScript as “userPrompt” and used as part of the AI prompt.
Step 2 – Create a text variable to receive the ChatGPT response
Let’s call it GPT_Response. This is the variable that will store the response from AI. It will be a text variable. It is recommended to give it a placeholder value, so it displays that while waiting for AI to answer.
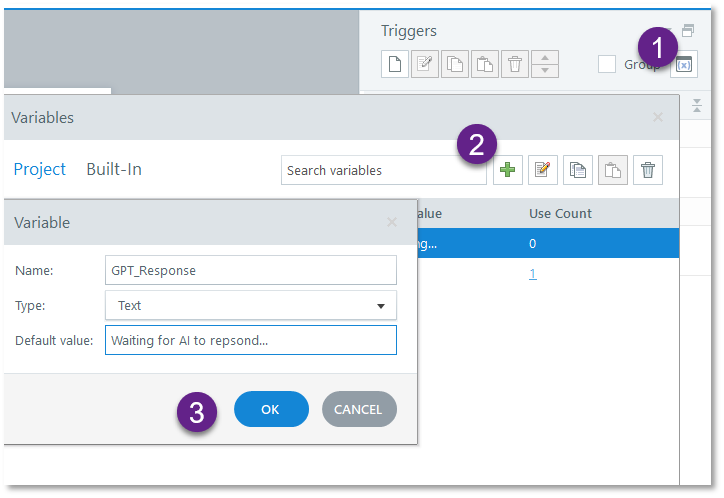
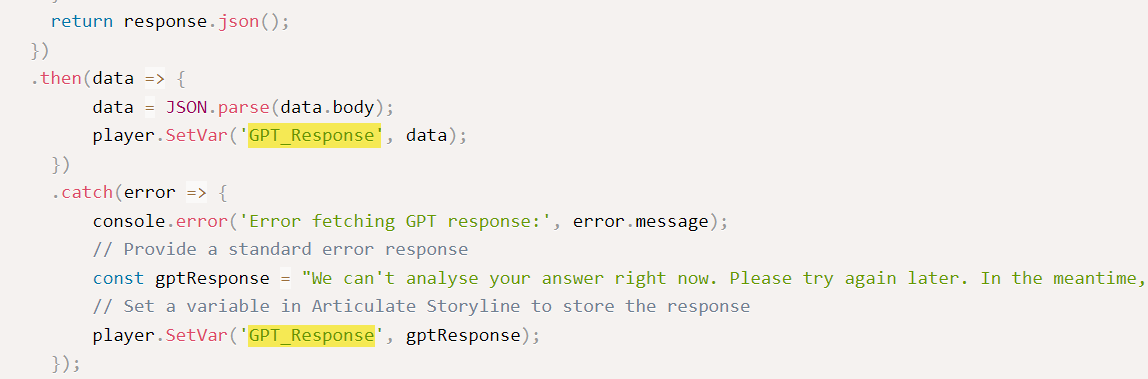
Note: that if you change this variable’s name, you will also need to change it in the JavaScript code as shown.
Step 3 – Create a button to call ChatGPT
Create a button and set a trigger to Execute JavaScript when the user clicks that button. This will send the learner’s question to ChatGPT.
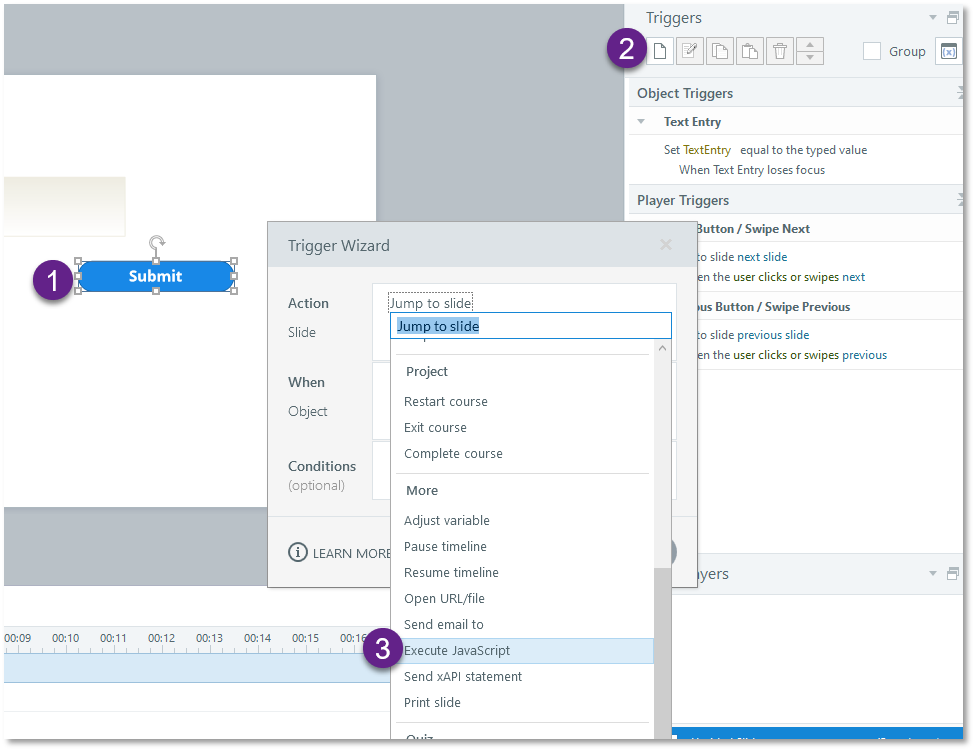
Step 4 – Copy the below JavaScript code into the Editor
Open the JavaScript Editor by selecting the JavaScript button on the trigger.
In the JavaScript window, copy-paste your AIReady code. Remember to make sure your input variable (TextEntry) and output variable (GPT_Response) are the same as in your Storyline file.
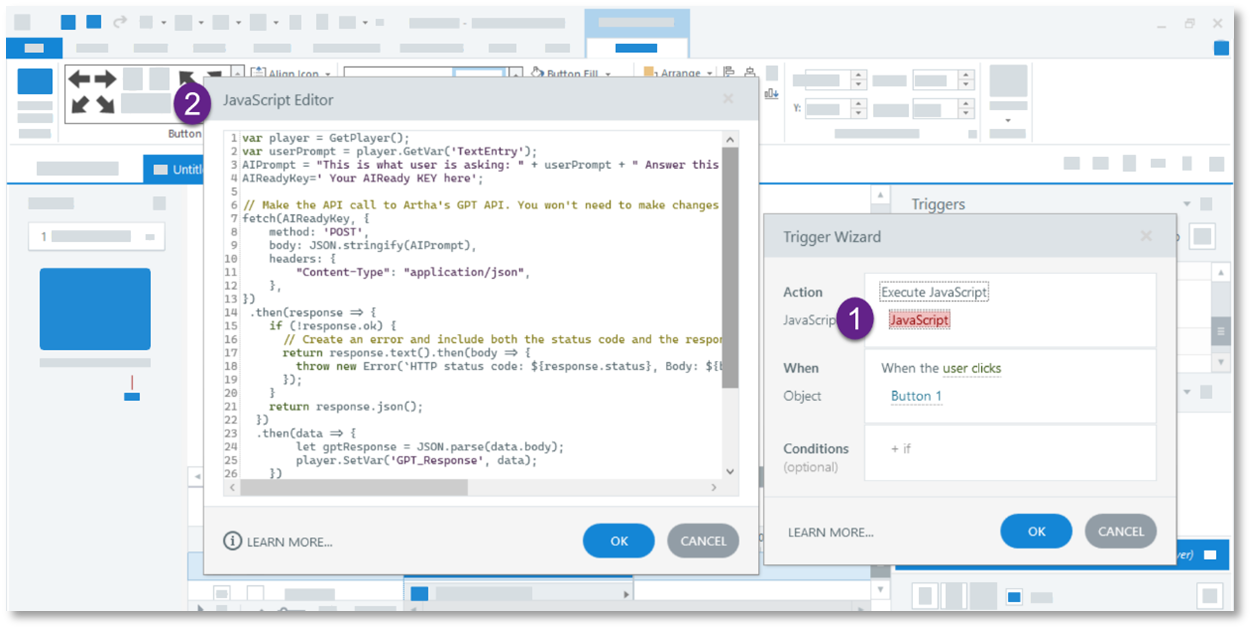
Step 5 – Update the prompt.
Depending on what you’re using the AI for, you’ll want to tweak the AI prompt that gets sent to ChatGPT. The prompt will significantly impact the quality of response from AI. For inspiration, check out the various use cases described in this guide.
For the simple use case of answering a question, our prompt could be the default:
AIPrompt = “This is what the user is asking: “ + userPrompt + ” Answer this question in 3 sentences:”;
Note: AIPrompt is usually different from the user input. As learning designers, this is your opportunity to provide context and instructions to the AI. For example, in the prompt above, we pass on the user input (marked as “userPrompt” in the code). In addition, we also tell AI that this is a user question, and we ask the AI to answer in 3 sentences only.
Some other variations of this prompt are provided below. See which one works best for your scenario and use that.
- AIPrompt = “Here is a question from a learner: “ + userPrompt + ” Provide a detailed response.”;
- AIPrompt = “Act as a coach, and answer this question – “ + userPrompt;
- AIPrompt = “You are a communication skills trainer. A seminar attendee asks this question: “ + userPrompt + ” Answer with examples.”;
Tip: You could test various prompts in the usual ChatGPT interface to see which one works the best for your use.
Note: Pay attention not to change the code structure when updating the prompt. Specifically:
- Any text from you should be in quotation marks “”.
- The userPrompt variable, which carries the TextEntry input, should not be in quotation marks, and can be appended to your text using a + symbol.
- The sentence should end with a;
Step 6 – Display the output in your slide.
Display the output by adding a text box and inserting the output variable (GPT_Response). You can also do this directly by typing %GPT_Response% in the text box.
If you have changed the output variable name, update it accordingly on your slide.
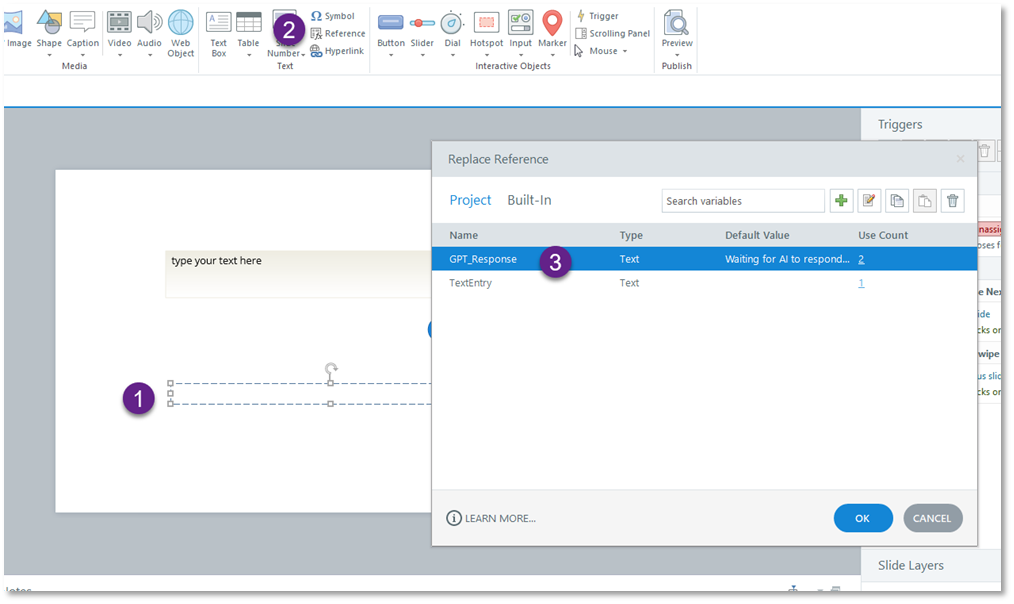
Step 7 – Publish to the web to test.
Storyline’s preview mode does not work with JavaScript. To test your implementation, publish to the web or create a review link.
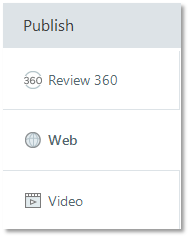
Storyline’s preview mode does not work with JavaScript. To test your implementation, publish to the web or create a review link.
Other Use Cases
Once you have the basic use case working, you can now try more interesting and adventurous applications. The great thing with AIReady is that it provides you a way to communicate with ChatGPT without limiting how it could be used. Anything that can be done in ChatGPT can be done via AIReady.
Note: At this time, this implementation does not support continued conversations via API calls. Every time the AI is called, it’s a new conversation. Therefore, you’d need to provide all required information in the prompt. Prompts can be 500 tokens long at max (about 2000 words).
Providing Feedback
In this instance, you want ChatGPT to take the learner’s UserPrompt and provide feedback. Give the AIPrompt specific and concrete guidelines. You can also include examples to increase the accuracy of the feedback.
AIPrompt = “Check for grammar, spelling, and syntax errors. Quote the sentences in the following response when providing feedback: ” + userPrompt +” \n For example, if the response has a long sentence, quote the sentence in your feedback and indicate that they should shorten their sentence.”;
Provide Feedback as an Expert
For generic topics with sufficient public information available, you can ask ChatGPT to ask an expert or known authority in the field and answer accordingly.
AIPrompt = “ Act as Brene Brown, a renowned expert in courage, vulnerability, shame, and empathy.. Answer this question by a learner: “ + userPrompt
Multilingual activities
ChatGPT can respond in multiple languages, and therefore can be effectively used in eLearning modules of different languages. Just make sure to instruct it to respond in the language needed.
AIPrompt = “You are an expert on greenhouse gases and climate change. Someone asks: ” + userPrompt +” Answer this question in 3 sentences in French:”;
Provide Company specific context or document
AIReady offers versatile ways to incorporate company-specific context into your AI interactions. This can be achieved with or without the use of our ‘documents’ add-on.
Without the AIReady Docs add-on:
You can provide contextual information through direct input as part of the prompt itself. This allows the AI to tailor responses based on the specific context of your query. By referencing key document details in your queries, you can guide the AI’s responses. Please note the limit imposed by the length of your prompt.
AIPrompt = “Acme Inc’s work from home policy is that employees need to work at least 3 days a week from the office. Only medical reasons are excluded. Managers can not exempt anyone without explicit permission from the Vice President. \n As part of manager training, learners are asked to respond to this scenario: Judy, your star team member, wants to work four days a week from home. She is willing to come to the office on Wednesdays only. How would you respond in accordance with Acme Inc.’s policies? \n The learner has answered as follows: ” + userPrompt +” \n Provide appropriate feedback in max 5 sentences to the learner’s answer. “;
With the AIReady Docs add-on:
To utilize the ‘documents’ add-on, upload your documents on the portal in PDF or text file format. You also provide a document ID in the process, which is vital for referencing them in your AIReady prompts.
When crafting a prompt, it is crucial to flank the document ID with newline characters “\n”. For example, your prompt might look something like
AIPrompt = ” \n <document> Documents/Acme_HR_Policy_12345</document> \n. ” + ” Answer this query : ” + userPrompt;
In this prompt, replace Acme_HR_Policy_12345 with your document ID.
This allows AIReady to accurately process and utilize your document’s content in response to your queries.
Assess User Input Based on a Rubric
Similar to the previous use case, you could send rubrics or other assessment criteria to ChatGPT and ask it to respond to the user based on that.
AIPrompt = “Assess the email text provided based on this rubric: 1. Understanding of Email Communication (0-5 points) 2. Appropriate Response to the Situation (0-5 points) 3. Advice on Effective Email Communication (0-5 points) 4. Presentation and Writing Style (0-5 points) \n The email text is + userPrompt;
Roleplay (advanced application)
Building a roleplay currently requires you to create an additional variable. To implement the AI roleplay on your slide, follow these five steps.
Create Variables:
In the Variables panel, create three Text variables. They must be named exactly as follows (case-sensitive):UserInputGPT_ResponsePreviousChat
Create User Input Field:
Insert a Text-Entry Field onto your slide, and assign it to theUserInputvariable.Display the Conversation:
Insert a Text Box that will serve as your chat display. Inside this text box, type:%PreviousChat%Pro-tip: Enable the “overflow” scrollbar on this text box for longer conversations.
Create a Submit Button:
Insert a Button and label it (e.g., “Send” or “Submit”).Add the Code Trigger:
Select your submit button and add a new trigger with these exact settings:- Action: Execute JavaScript
- When: User Clicks
- Object: Your submit button
Copy and paste the entire JavaScript code below in the JavaScript window.
					var player = GetPlayer();
var userInput = player.GetVar('UserInput');
var systemPrompt = "Roleplay as an angry customer. The user will roleplay as an airlines agent. Respond to user in 2 lines. Do not break character. Don't add You: or Manager tags.";
var previousChat = player.GetVar('PreviousChat') || "";
var isFirstTurn = previousChat.trim() === "";
AIReadyKey='YOUR AIREADY KEY';

var AIPrompt = systemPrompt + "\n\n" + (isFirstTurn ? "" : previousChat + "\n\n") + "Manager: " + userInput;

// API call

fetch(AIReadyKey, {
    method: 'POST',
    body: JSON.stringify(AIPrompt),
    headers: {
        "Content-Type": "application/json",
    },
})

.then(response => {
    if (!response.ok) {
        return response.text().then(body => {
            throw new Error(`HTTP ${response.status} - ${body}`);
        });
    }
    return response.json();
})
  .then(data => {
        data = JSON.parse(data.body);
        player.SetVar('GPT_Response', data);
           let newTurn = "<b>You:</b> " + userInput + "<br><br><b>Employee:</b> " + data;
           let updatedChat = isFirstTurn ? newTurn : previousChat + "<br><br>" + newTurn;
    player.SetVar("PreviousChat", updatedChat);
    })

    .catch(error => {
        console.error('Error fetching GPT response:', error.message);
        // Provide a standard error response
        const gptResponse = "We can't analyse your answer right now. Please try again later. In the meantime, you could review and reflect on your course content.";
        // Set a variable in Articulate Storyline to store the response
        player.SetVar('GPT_Response', gptResponse);
    });
Audio Interactions using AIReady
Setting up the audio chat feature using AIReady is simple. Please follow these steps:
[NOTE: this feature can only be previewed when exported as a web package or after hosting it on a server or an LMS because of browser restrictions in preview mode or the review link. ]
Images/Buttons Required:
1. A play/pause button with three states: replay, play, and pause. Set this to the Hidden state initially. Name it AudioControl (for example).
2. A mic button/image. Name it Mic (for example)
Variables Required:
Audio_Play_State – Numerical – Default Value: 0 – To control the audio button
Audio_var – Text – Default Empty – To store the audio
GPT_Response – to store AIReady response
TextEntry – for the user input
Triggers:
Set the mic button to have two states: Normal and selected. When the user clicks the Mic, then show the layer “Listening.” In this layer, you can add a “I’m listening” state to indicate to the user that the mic is on. Add an Execute JavaScript Trigger to this mic button. Look at the first point under the JavaScript heading in this document.
We will use the Audio_Play_State variable to control the state of the AudioControl button:
Set the state of AudioControl to normal when audio_var changes:
Add an Execute JavaScript when the user clicks AudioControl, and a separate trigger for the Send button to execute JavaScript
JavaScript
1. Execute the following when the user clicks Mic.
					var SpeechRecognition = SpeechRecognition || webkitSpeechRecognition;
var SpeechGrammarList = SpeechGrammarList || webkitSpeechGrammarList;
var SpeechRecognitionEvent = SpeechRecognitionEvent || webkitSpeechRecognitionEvent;

var recognition = new SpeechRecognition();
var speechRecognitionList = new SpeechGrammarList();
recognition.grammars = speechRecognitionList;
recognition.lang = 'en-GB';
recognition.interimResults = false;
recognition.maxAlternatives = 1;
recognition.start();
recognition.onresult = function(event) {
    var speechResult = event.results[0][0].transcript;
//return speech and change storyline variable with a result
    var player = GetPlayer();
    player.SetVar("TextEntry",speechResult);
    body.state = "Hidden";
  }
  recognition.onspeechend = function() {
    recognition.stop();
  }
2. When the user clicks AudioControl, the following JavaScript should trigger:
					var player = GetPlayer();

let state = player.GetVar('Audio_Play_State');

if (state == 1 ){
    player.GetVar('audio_var').pause();
    player.SetVar('Audio_Play_State', 0);
}

if (state == 0 ){
    player.GetVar('audio_var').play();
    player.SetVar('Audio_Play_State', 1);
}

if (state == 3){
    player.GetVar('audio_var').load();
    player.SetVar('Audio_Play_State', 0);
}
3. JavaScript when you click the Send button:
					var player = GetPlayer();
var userPrompt = player.GetVar('TextEntry');

AIPrompt = `
You are an AI Coach. Answer questions in one sentence only.
The latest user is ${userPrompt}
Avoid using markdown formatting or html formatting in your response. Only use <b></b> tags if necessary.`;

// Make the API call to Artha's GPT API. You won't need to make changes to the below code except to rename the GPT response variable if necessary.
AIReadyKey='https://api.arthalearning.com/aiready?key=USEYOURKEY;

//Add this new Var RequestData as we need to wrap our AIPrompt variable with some extra tags to get an audio response.
var requestData = {
  role: "system",
  content: AIPrompt,
  metadata: {
      activityID: "Document-Retrieval",
      responseType: "audio"
  }
};

fetch(AIReadyKey, {
    method: 'POST',
    body: JSON.stringify(requestData), // Update this line from AIPrompt to requestData
    headers: {
        "Content-Type": "application/json",
    },
})
 .then(response => {
    if (!response.ok) {
      // Create an error and include both the status code and the response text
      return response.text().then(body => {
        throw new Error(`HTTP status code: ${response.status}, Body: ${body}`);
      });
    }
    return response.json();
  })
  .then(data => {
  //------------------------This is the new way to handle our AIReady response. We are checking if we receive audio and calling our helper function to play the audio.
  let aiReply;
  if (data && data.body) {
      try {
          aiReply = typeof data.body === 'string' ? JSON.parse(data.body) : data.body;
          if(aiReply.audio){
            aiReply = JSON.parse(data.body).text;
            playBase64Audio(JSON.parse(data.body).audio);
            player.GetVar('audio_var').addEventListener('ended', function() {
              // Code to execute when the audio ends
              player.SetVar("Audio_Play_State", 3);
            });
            player.GetVar('audio_var').play();
          }
      } catch {
          aiReply = data.body;
      }
} else if (data?.choices?.[0]?.message?.content) {
      aiReply = data.choices[0].message.content;
  } else {
      aiReply = JSON.stringify(data);
  }

  if (typeof aiReply === "string" && aiReply.includes("Internal Server Error")) {
      aiReply = "Sorry, I couldn't respond due to a server issue. Could you please try your question again?";
  }

  player.SetVar('GPT_Response', aiReply);

})
.catch(error => {
  console.error("AI error:", error.message);
  player.SetVar('GPT_Response', "Sorry, I couldn’t respond due to a server issue.");
  console.log('GPT_Response');
});

// Please add this as is.
function playBase64Audio(base64String) {
  let byteCharacters = atob(base64String);
  let byteNumbers = new Array(byteCharacters.length);
  for (let i = 0; i < byteCharacters.length; i++) {
      byteNumbers[i] = byteCharacters.charCodeAt(i);
  }
  let byteArray = new Uint8Array(byteNumbers);
  let blob = new Blob([byteArray], { type: 'audio/wav' });
  let url = URL.createObjectURL(blob);
  var audio = new Audio(url);
  player.SetVar("audio_var",audio);
  player.SetVar("Audio_Play_State", 1);
  audio.addEventListener("loadedmetadata", function(_event) {
          var duration = audio.duration;
      });
}
These were just a few examples of how to use AIReady. The use cases are only limited by your imagination, and we hope to hear about various ways you will use it in your work!
Customizing Voice, Style, and Prosody
When using Audio Interactions, you can customize the voice persona, speaking style, speed, and pitch to match your scenario (e.g., a “Customer” vs. a “Manager”).
To do this, you need to modify the requestData variable inside your JavaScript trigger. You will add a voice object inside the metadata section.
Code Snippet: Find the var requestData section in your Audio JavaScript and update it to look like this:
					var requestData = {
  role: "system",
  content: AIPrompt,
  metadata: {
      activityID: "Document-Retrieval",
      responseType: "audio",
      // Add the voice settings here
      voice: {
          voice_name: "en-US-DavisNeural",  // See supported voices below
          style: "chat",                    // See supported styles below
          rate: "medium",                   // Optional: "slow", "fast", "+10%"
          pitch: "default"                  // Optional: "low", "high"
      }
  }
};
Supported Settings:
voice_name: The specific avatar voice you want to use. Common examples include:
en-US-AriaNeural(Default, Female)en-US-DavisNeural(Male, good for conversational roles)en-US-GuyNeural(Male)en-US-JennyNeural(Female)
style: The emotion or tone of the voice.
general(Default)chat(Casual conversation)cheerful(Positive feedback)sad(Empathy scenarios)angry(Difficult customer scenarios)Note: Not all voices support all styles.
rate: Controls the speed of the speech. Useful for accessibility or creating urgency.
Examples:
0.9(slower),1.1(faster),medium.
pitch: Controls the tone frequency.
Examples:
low,medium,high.
Advanced Techniques
- Show AI response in a different layer or slide for a better learner experience.
- Ensure your slide has enough space to display ChatGPT’s long answers. You can also limit it to a specific length by specifying the answer length in the prompt.
- Use new line character “\n” to divide a very long prompt in paragraphs for AI.
- You can require AI to respond in a custom JSON format to execute complicated asks in a single prompt. A good knowledge of JSON is required. You will need to parse the response data twice to get to the JSON elements.
Model Switcher
In addition to creating dynamic AI-driven interactions, you have the flexibility to specify which AI model is used for each query. This allows you to select the best-suited model based on the context or complexity of the task.
To do this, add the following snippet after your AIPrompt definition:
					AIPrompt = {
  "content": AIPrompt,
  "metadata": {
    "model": "azure-gpt-4o"
  }
};
Here’s how it works:
- “content”: This holds the text of the query that will be processed by the AI.
- “metadata”: This optional section allows you to specify additional information, such as which AI model to use.
In the example above, the “model”: “azure-gpt-4o” line specifies that the Azure GPT-4o model will handle the query. You can replace “azure-gpt-4o” with any model from the supported list. We will continue to update this list as AI technology evolves.
Default Behavior
If you do not specify a model, the system will automatically default to the current standard model (Currently gpt 3.5). This ensures that even without customization, your queries will be processed smoothly using the most appropriate AI available.
Supported Models:
Here’s a list of the models currently available for selection:
- azure-gpt-35-turbo
- azure-gpt-4o
Enhanced Metadata Options for User Insights Report
Learning designers have the flexibility to enrich user insights by adding metadata to the AIPrompt. This feature provides two key options:
- User ID Integration: Tag responses with unique user IDs to identify individual usage patterns in reports.
- Activity ID Tagging: Use activity IDs to distinguish interactions, which simplifies tracking engagement across modules and interactions.
These metadata additions empower deeper, tailored insights to refine learning experiences.
To do this, add the following snippet after your AIPrompt definition:
					AIPrompt = {
  "content": AIPrompt,
  "metadata": {
    "userID": "Name or ID of user",
    "activityID": "Unique Activity ID"
  }
};
Debugging
Problem: ChatGPT is not responding
Debugging steps:
- Visit https://status.openai.com/ to confirm that ChatGPT is not down.
- Check your network settings to confirm your Internet is not down.
- Confirm your JavaScript code is exactly as per the code here. A long line in JavaScript should not be divided into multiple shorter lines.
- Confirm that you are not checking in Storyline’s Preview mode, which does not work with JavaScript. Instead, publish to the Web to test.
- Confirm that the AIReady key is correct by checking it against your email.
Debugging (advanced):
If the above did not rectify the situation, and you have experience with coding, add debug messages in the code and use Chrome to see where the problem is by using Inspect Mode.
- config.log (AIPrompt);
- config.log (GPT_Response);
Problem: ChatGPT is not giving answers as desired.
Solution 1: Prompt Engineering
Play around with the format of the AIPrompt to achieve what you’d like. If needed, you can also include criteria and examples within the prompt to further guide the AI.
Solution 2: Check your variables
Double check your input and output variables in JavaScript against the ones in your slide. Sometimes, if you have copied and pasted your slide, the input variable would change automatically (For example, from TextEntry1 to TextEntry2), and would not match your JavaScript code.
Solution 1: Prompt Engineering
Structure your prompt to give the AI clear, unambiguous instructions about its role and the conversational boundaries. The goal is to leave no room for misinterpretation, even when the user’s input is confusing.
-
Use Structural Tags: Organize your prompt into sections using distinct tags like
<RULES>,<PERSONA>, and<CONVERSATION_HISTORY>. These act as containers that clearly separate the AI’s instructions from the dialogue it needs to analyze. -
Set Forceful Rules: Create a dedicated rules section with direct, explicit commands. Negative constraints are highly effective. For example:
Your one and only role is the [AI Character]. You must NEVER adopt the persona of the [User Role]. -
Prime the AI’s Turn: End the final prompt sent to the API with the AI character’s label (e.g.,
[AI Character]:). This cues the AI, telling it exactly whose turn it is to speak.
Solution 2: Maintain a “Private Script” for the AI
Use two separate chat logs. The log shown to the user should have simple labels like “You:“. The hidden, plain-text log sent to the AI should use specific, unambiguous labels like “[User Role]:” and “[AI Character]:“.
Problem: ChatGPT switches roles in roleplay interactions.
Solution 1: Prompt Engineering
Structure your prompt to give the AI clear, unambiguous instructions about its role and the conversational boundaries. The goal is to leave no room for misinterpretation, even when the user’s input is confusing.
-
Use Structural Tags: Organize your prompt into sections using distinct tags like
<RULES>,<PERSONA>, and<CONVERSATION_HISTORY>. These act as containers that clearly separate the AI’s instructions from the dialogue it needs to analyze. -
Set Forceful Rules: Create a dedicated rules section with direct, explicit commands. Negative constraints are highly effective. For example:
Your one and only role is the [AI Character]. You must NEVER adopt the persona of the [User Role]. -
Prime the AI’s Turn: End the final prompt sent to the API with the AI character’s label (e.g.,
[AI Character]:). This cues the AI, telling it exactly whose turn it is to speak.
Solution 2: Maintain a “Private Script” for the AI
Use two separate chat logs. The log shown to the user should have simple labels like “You:“. The hidden, plain-text log sent to the AI should use specific, unambiguous labels like “[User Role]:” and “[AI Character]:“.
Problem: ChatGPT’s response is too short or too long.
Solution: Prompt engineering and slide design
In your prompt, make sure to specify the length of the intended response.
Also ensure that the text field on your slide where the variable %GPT_Response% is displayed is appropriately sized.
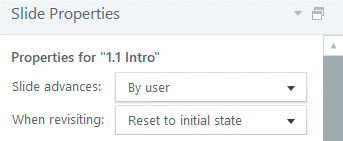
Problem: Re-loading slides remembers the previous slide answers.
Solution: Reset to initial state.
When a learner revisits the slide, they may see the AI’s previous response to their input. If that is not ideal, change the slide properties to reset to the initial state.
Domain Security (Recommended)
To ensure your AI interactions are secure and function correctly wherever your course is hosted, AIReady offers an optional “allow-list” feature. While not mandatory, we highly recommend enabling this for live courses to protect your usage quota from unauthorized use.
How It Works
When a learner triggers an AI interaction, AIReady checks where the request is coming from. If you have enabled this feature and the course is hosted on a website not on your list, the AI will block the request.
Setting Up Your Domains
If you would like to enable domain restrictions, please email us at aiready@arthalearning.com. In your email, include a comma-separated list of all domains where your content will be hosted.
Recommended Domains to Allow
If you choose to enable this feature, we recommend adding the following standard domains to ensure your course works seamlessly on Articulate’s review platforms (if you are using Articulate) and your own hosting:
- articulateusercontent.com (Required for Articulate Review 360)
- articulate.com (Required as a wrapper fallback)
- Your LMS Domain (e.g., lms.yourcompany.com)
- Your Custom Hosting (e.g., your-bucket.s3.amazonaws.com)
User Insights Report
Customers with LEAP or LEAD subscriptions will get a system generated User Insights report in the first week of every month unless opted out. The csv report will have timestamp, AI Prompts and AI Responses logged for the past month.
Support
Please reach out to aiready@arthalearning.com and we’ll get back
to you in 3-5 business days. Please include your storyline file and a
screenshot or screencast of the issue so we can better understand your concerns.